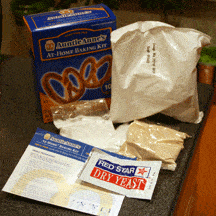
I’ve tried the Auntie Anne’s At-Home Baking Kit before and LOVED it. There really is nothing better than pulling a hot, freshly baked, just buttered, soft pretzel out of the oven and then stuffing your face with it. I knew already that the At-Home Baking Kits allow you to make pretzels that taste like ones actually from the Auntie Anne’s stores. What I didn’t know was that with their new and improved baking kit, you could get freshly baked pretzels out of the oven even faster. Or for those of you who are really adventurous, you could even use their baking kit to make things beyond pretzels – such as a deep dish pizza (yes, really!) Needless to say, when I had an opportunity to test out the new Auntie Anne’s At-Home Baking Kit, my answer was an adamant “YES!”
About Auntie Anne’s At-Home Baking Kit
The Review

Again, to make the pretzels I followed their clear instructions.
Step 1: Make the yeast mixture by adding lukewarm water to the yeast.
Step 2: Mix the dough mix into the yeast until slightly stick, then knead for 5-7 minutes. I’ll admit that I cheated this step a little bit. I mixed them together in a pretty large bowl, so instead of putting it onto a floured surface to knead, I kneaded the dough in the bowl until it had the right texture and stickiness.
Step 3: Put the dough into a sprayed bowl with sprayed plastic wrap on top and let the dough rise – for 30 minutes to be exact. I don’t recall how long the old kit had you wait, but it was longer than 30 minutes.
Step 4: After the dough has risen, portion out into even amounts. I just shaped the dough into a loaf and sliced with a knife.
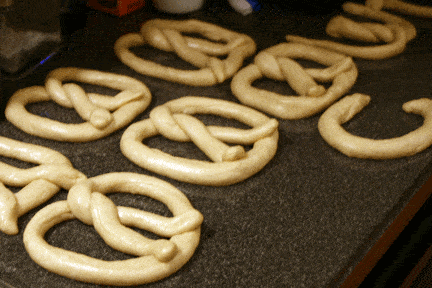
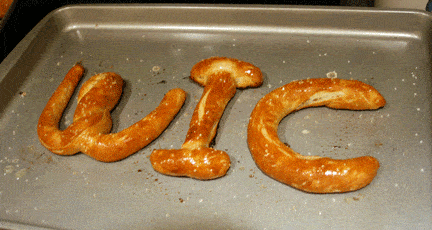
Step 5: Roll out the dough and twist into a pretzel shape. This part is pretty easy once you get the hang of it. I think the key is having enough counter space to get the roll about 3 feet wide. Then you’ll have plenty of pretzel to fold and twist into the soft pretzel shape we all love. For some extra fun with the kids, you can also create other shapes or letters with your pretzels.
Step 6: Dip into the baking soda mixture, remembering to use a CLOTH towel to absorb the excess liquid. Using a paper towel will cause your pretzel to stick to the towel, which isn’t pretty.
Step 7: Baking in the oven for 7-10 minutes, rotating the tray half-way through.
Step 8: After the pretzels are golden brown, pull out the tray, coat with butter. The pretzels are now done if you wanted original or if you wanted cinnamon sugar, you can coat them all with the included cinnamon sugar mixture.
Once again, Auntie Anne’s has created an easy to making baking kit that allows you to bake up delicious pretzels (or bread or pizza) at home. No more going to the mall and fighting crowds to get freshly baked pretzel dogs. The first batch of pretzels I made lasted less than 24 hours – 6 of the 8 pretzels were eaten within 2 hours (men and their appetites!) The second batch of pretzels lasted TWO days, but only because I hid three of the original pretzels by the pastas so I could actually get to enjoy them.
Normally you would need to go to an Auntie Anne’s store to pick up an At-Home Baking Kit. BUT….I recently received an email from Auntie Anne’s saying the were featured on QVC, and lo and behold, QVC is STILL selling Auntie Anne’s At-Home Baking Kits online(as of 10/12/10.) You get two boxes for $24.18, which includes shipping. I called my local Auntie Anne’s and they sell the kits for “$12-something” each, so when I purchased through ShopDiscover (to get my 5% cashback), it was cheaper to buy the kits through QVC.
I’ve gotten a few questions about storing these pretzels. The way the kit is made, you need to make a full batch of pretzels at a time. If you’ll be eating them within a few days, you can leave them in a sealed Ziploc bag and then nuke in the microwave for about 10-15 seconds to warm them back up. If you won’t be eating all of your pretzels as quickly as we did, then you can freeze the uneaten pretzels until you are ready to eat them, then thaw and reheat.
Auntie Anne’s Online
- Visit the Auntie Anne’s Website
- “Like” Auntie Anne’s on Facebook
- Follow Auntie Anne’s on Twitter
- Buy the Auntie Anne’s At-Home Baking Kit from QVC
Disclaimer: This post consists of my (and/or fellow tester) opinions only. Your experiences may be different. No compensation was given for this review/giveaway. I did receive a free Auntie Anne’s At-Home Baking Kit from the manufacturer or their representing PR agency to use and test for the purposes of this review. This did not affect the outcome of this review.


Yum pretzels, hot from the oven.
Exactly!
They are now sold at Walmarts and Kroger for even less. I think I picked mine up for around $6